Apr 14, 2013

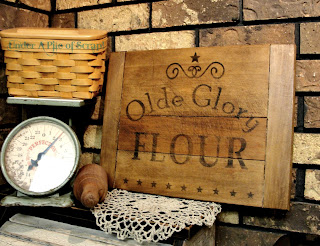
Our Hand Made Rustic Bin

If you've been following along on my blog lately, then you may have noticed my latest trend of rustic/primitive projects. 

I like rustic decor and it seems to be a bit of a trend all over. That may be why I do fairly decent at my craft shows, for being a no-name crafter that is.

Sometimes I can get my hubby to show a little enthusiasm too. Especially if I can convince him that what I need him to do is simple. 

He helped me out a lot with the memo boards & chalkboards. So I showed him what I thought was a simple project, but proved to be a little more laborious than I anticipated, but he/we got'er done!

I was going to post the picture here of the inspiration piece, but I'm having problems getting it to post no matter how I try. 

So here's our black painted version, which has graphics added to it, where the other one was just plain dark blue.

primitive storage

Sorry about the poor photo quality, but it's been so gloomy & rainy all week, that I had to use my flash and I still couldn't get the photo editing program to help me create the money shot

But in these shots I wanted to show how it works great for Keurig coffee pod storage, boxed or not. 

Keurig storage
 
And this a close-up of the graphic I used, which is the same one I made for the wooden grain scoop I decorated too.


I put it in my craft show this past weekend, but it didn't sell. I sort of followed my hubby's advise on the price, but I think it was too high. Actually, he wanted it to be priced even higher, but I disagreed with that one for sure! I've done enough shows in our area to have a better idea of what the threshold is for people in our area. I'm not saying that no one would ever pay his asking price, but it's just gonna a take a while to find the right person, but I don't want to hang onto it that long. LOL!


farmhouse, farm house, rustic, diy, wood project, painted furniture, coffee bar
It holds 3 boxes of pods nicely while giving you the top shelf available to easily grab one for use. I didn't have this in mind when I wanted the hubby to make it, but the idea just came to me while looking for someplace to take a decent photo & I was moving my son's coffee pod boxes out of the way.

It may not be the perfect solution for everyone, but it does work.

Photobucket 
Parties I'm linking to:

mop it up mondays

Apr 11, 2013

My Beach Theme Suitcase


That's BEACH, not the other nasty word. hee hee!

Now that we actually seem to be in full Spring mode here in northern Indiana, it has me thinking of the things I want to do this summer. Going to the beach might be one of those things!
 
But...beach season is quite a ways off, so in the meantime, if I want to feel a bit beachy, I decided to create this piece of decor.

vintage suitcase

I was inspired by seeing a vintage suitcase that had the word BEACH roughly painted it & an arrow. I don't even remember many of the details, because right away, my mind was dreaming up this design even before I had the suitcase.

This suitcase was purchased at a thrift shop and originally was all blue, like the trim color. You can imagine my excitement when I seen it sitting in the shop!

But there were set-backs. There's always set-backs.
 
First, I had issues with getting the design to cut for me on my Silhouette Cameo, until I eventually ruined the blade on the last attempt. I found a decent blade deal on Ebay and now have 1 with an additional 1 as a back up.  

New blade is in & I get the design to cut b-e-a-u-tifully, but because I used contact paper, it didn't want to stick to the surface of the suitcase at all. Ugh! Yes, I cleaned the surface of the suitcase well. There were scuff marks that had to be scrubbed off first.
  
So then I had to go over the back of each contact paper piece with some repositionable glue, and that helped, but apparently not enough. My first coat of creamy ivory paint seemed to do well. A false sense of relief came over me. But when I went over it with the 2nd coat, I could tell the contact paper was starting to lift and I knew the paint was seeping underneath.  Sure enough, every single image had major paint seepage. Crying.

This is the part that people don't want to pay you for. The part of your time it takes to make something sellable, but doesn't make you enough money for what you had to do to get it to that point. Follow me?
.
.
.
.

I had to take wet Q-tips & go over each letter and image by hand and rub off the excess paint. It's not perfect and the edges aren't clean & smooth, but I think it gives it a rustic, beach worn look, yet looks pretty good, even from a short distance. It's just when you look at it real closely that you notice the quality.

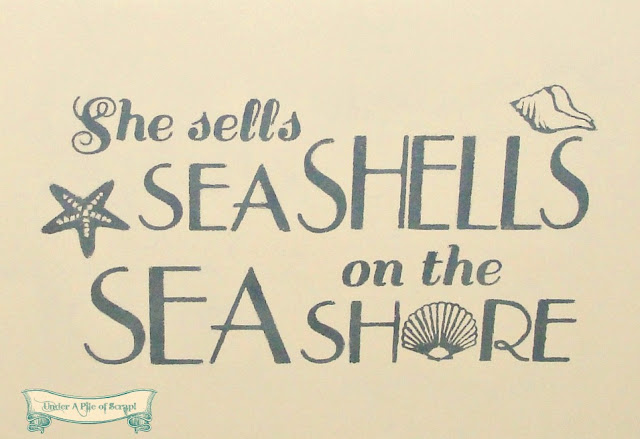
Sea Shell decor


AND, just to toot my own horn a little bit. I created this design all by myself. As much as I loved my Cricut Expression (and still do) I didn't have much creative freedom with it like I do on my new Cameo.


Photobucket 
Parties I'm linking to:
 
mop it up mondaysVisit thecsiproject.com

Apr 10, 2013

So Now I've Got A Wood Scoop

home decor styles, farm house, farmhouse, rustic, country, kitchen, primitive
What would I do with that wood scoop?  


Do you know what wood scoop I'm talking about?


Primitive wood scoop
  

This wood scoop is the one that I picked up at the thrift store with this group of goodies.
thrift store
Could you tell I was so excited when I went on and on about them in my Thrift Store Goodies post? Oh yes, I was.

And before I knew it, I was already working on the cutting board. 

Wooden cutting board
If you missed out on that project, feel free to check it out here.

I noticed a few people were really admiring the wooden scoop in that first post too. To be honest with you, tears nearly ran down my legs when I spotted it. I can just hear it now, "Clean up in isle 7! And bring the mop and disinfectant."

But I managed to contain my excitement and just grabbed it as quick as I could. THEN, I looked at the price. What??? It was less than a dollar and I also got 10% off that. Score!!

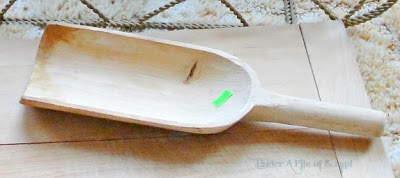
I've been pondering about what to do with it. I mean, it's cool enough just as it sits, all pale and naked. But I can't just leave it go like that. It needed something to dress it up & yet make it look rustic. Like it had been used and had a previous purpose in life.


 This is so much more to my liking. 

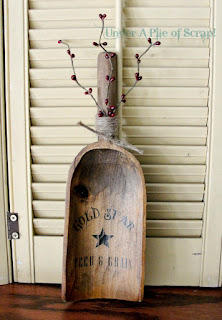
wood scoop
I seen this name when I did a Google search for "feed and grain." I wanted something that seemed fitting for a scoop. I have no idea what a wooden scoop might have actually been used for, but this seemed likely. 

The images with this name were all really generic looking and quite plain with just a single line. I have quite a space to fill on this good sized scoop, and even though I'm going for rustic, I wanted to spice up the look.


wood scoop
The font I used for Feed & Grain is called Niagra Engraved and it has some pretty slim lines that are barely noticeable, but I still loved how it looked. Again, I used my Silhouette Cameo to make this design.

I wrapped a small portion of the handle with some twine and tied it off, then stuck in some burgundy pip berries. I don't show it in these photos, but once my battery pack charges for my drill, I'm going to drill a hole in the top of the handle so I can add some twine or rag ribbon to hang it with.
 wood scoop


                Before                                                                          After
wood scoop plain wood scoop
I'm so glad that I'm getting this stuff done. I just wish it would look like I'm making a dent in the whole hoarding look I have going on right now in my home.


Photobucket
I'm linking up to these parties: 

Visit thecsiproject.com

Apr 9, 2013

Do You Have An Obession?


I seem to have a small obsession. It might appear that I have an obsession with a collection. Well, it's not really an obsession of a collection for myself. It could be fuel for someone else's collection obsession though, if I'm lucky!

You've seen the pictures all over the magazines and Pinterest where people have a very full crock or basket of vintage rolling pins. I have to say that I kinda have rolling pin envy when I see those pictures. But honestly, I don't have anywhere to put them. So how do I get the thrill of being able to buy rolling pins without having to find a place in my kitchen for them?

I decorate them and sell them! 

(Insert a picture of all of the rolling pins in a holder here-if there isn't one, then I've been slacking and didn't get it done by the time this was published)

It's kind of like the best of both worlds. I can shop for them and have the thrill of the hunt, while not having to worry if I have too many or a place to keep them. Well, I still have to worry about where to keep them until I sell them, but if I'm lucky, it's only temporary.

This is the first one I made. I was happy to see it sell last year.
 

Then I had another older rolling pin that I thought would be cute all painted up too.

I haven't had it in any shows yet, so it goes in my next one that's coming up soon.
 

I wanted to point out that I think it's a great way to display a family keepsake. Not that I have any from my own grandmothers, but it would make them even more special if they had the family name or the grandmother's name painted on it.

After doing the first two in the same design, I decided to change it up a little with this design.
painted decor, farmhouse, farm house, rustic decor, primitive, diy, upcycle,

 This one fits a little more into the primitive look.

 This photo looks a little more grey than the tan-ish color it really it is.

Some of you may be gasping at the fact that I'm completely covering up a vintage rolling pin with paint. It's OK. In the case with this last one, it already had quite a bit of paint splatter and paint smudges on it, so I didn't think it was a big deal. I'm thinking I did it a favor.

On the topic of rolling pins - I was going to work on another rolling pin from my stash and I noticed that one of them is really heavy, has bearings in it and it has a stamp on one end that says Foley. I did a little research and learned that it must be a highly collectible rolling pin that was made from the 1920 to the 1960's. Really?!!

Collectible Rolling Pin
They're going for $10+, but mostly double that on Ebay & Etsy, and that doesn't include the $10+ for shipping! Crazy. 

Nope. I don't think I'll be painting this one up.


 Photobucket 
Parties I'm linking to:


Apr 8, 2013

Chalkboard from a Cutting Board


Since I had been sick with a doozey of a head cold, I haven't done too much. Having a tissue stuffed up your left nostril while using the bottom portion to sneeze into kind of puts a damper on doing anything. Especially when you have to change it out every 5 minutes, if you're lucky.

That's why when I seen a cool project by Stephanie on "The Cozy Old Farmhouse" blog, I thought I could manage that one with said tissue sticking out of my nose. Well, there is a teensy little drawback to doing it with a runny nose, but I'll get to that in a bit.

One of the best parts about doing a project is when you have everything on hand already. 

Then next best part to having everything on hand is KNOWING where everything is too! ;) Around here, that can be the trickiest part to any project.

chalkboard, cutting board, upcycle, farmhouse decor, kitchen decor,

Isn't that a darling idea?! I actually think I seen it before on Pinterest from someone else, but didn't pin it and didn't remember it either, until I seen Stephanie's. I really liked the rustic look it had. Mine is a tad different from hers, since she was trying to fix a faux pas that ended up working out for the better. I think she taped off the shape for hers, but I set out on the wild side & decided to go freehand. 


I took some Minwax gel stain in Aged Oak and coated the entire cutting board, front and back. You just never know if someone doesn't want the chalkboard look and may want it to be plain, so now they have that option. I know, I fret over all kinds of little things that other people may not even dream up. But I like to create multiple uses for things where ever possible. You'd be surprised at some of the complaints I hear as to how someone wishes it looked like something other than what I did.

Oh, and the gel stain? That's where the runny nose can create problems. The next thing you know, your nose is suddenly gushing & now you have brown spots on your nose and above your lip from the stain that's on your fingers & hand. Yeah, it would make for a funny picture for y'all, but I don't live that far on the wild side.
  
Next, I just used some of my brush-on black chalkboard paint (that I purchased at Walmart) - applying 2 coats and letting it dry between each coat. I used a medium sized artist paint brush, so I could have better control for crisp lines around the edge and a smoother finish, in spite of all the cuts in the wood.

After all that, I took some twine and wrapped it around the handle like Stephanie did, sort of. Actually, the chalk hangs down lower than in these pictures, but it kind of screws up seeing the writing on the board, so I wrapped it around the back again after tying it off so it would look nicer for the "money shot."

Now it's ready for my first ever spring craft event!


 Photobucket 
Linking to these parties: 


Apr 7, 2013

A Little Bit Country Chalkboard

With chalkboards being all the rage these days, and having made several myself over the past 2 years, it looks like I'm at it again. If you want to see some of my other chalkboard work, check out here, here, here, or here.

A little FYI, my hubby is a licensed plummer and also does HVAC work, so he has many opportunities to pick up some pretty awesome stuff for ME to work with!

Take this galvanized panel here, for instance.


He brings one home for me to see if it's something I can use. Ummmm....Heck YEAH!! Are you kidding me? At the time, I didn't know just what for, but I was sure something would come to me. He also informs me that there's 36 of them. They're some kind of panel that gets removed off of some furnaces they're installing for an apartment complex. Oh, and guess what? There's going to be 36 more later too. 

Here is one that I made.

Rustic Chalkboard, primitive, farmhouse decor, upcycle, diy

I figured I'd include the size in case anyone asked.

Of course, this isn't everyone's taste, but I'm hoping it's a good seller. Oh, & did I mention that I only get 3 hours to sell for this next show?


barn star
This Metal Star is also a Magnet
Bottle cap magnet
The Bottlecaps are made into magnets

Then, I decided I could just make a magnetic memo board in a bit more of a shabby chic style, because I know some people that like that look also.

Shabby chic, magnetic, farmhouse decor, shabby

I have one more chalkboard made, but it's all just the basic black with the same stained frame style as the first one. It will be for sale, but I'm also using it to display the magnets that my daughter made to sell. 

One more is painted and waiting in the wings for a frame and that may be all I get done for this round since I don't have anymore wood prepared for frames. The wood I used for these was also free because my hubby picked it all up from somewhere & had to be cut down. I sanded them all then painted or stained them in with Minwax Aged Oak gel stain. It matched well with the vintage ruler I used for the one in the first photo.

I was hoping to get some pillows made, along with a new tablecloth for my booth space, but my sewing machine is messing up, so I'm not sure any of that will happen. 

Check back frequently this week as I will be posting pretty much every day to share the new stuff I've been working on.


Photobucket 
Parties I'm linking to:
Funky Junk

Related Posts Plugin for WordPress, Blogger...