Showing posts with label ornament. Show all posts

Dec 19, 2013

Teacher's Gift with the Silhouette


Just a quick post today to share with you a simple teacher's gift that I made up for my daughter to give to her 4th grade teacher.  Her teacher's last name is Hopple and even before she got married, she collected frogs, so it's kind of funny that she collects frogs AND her last name is Hopple.

teacher gift, silhouette, frog, Christmas

It's a large bottle of Hand Sanitizer that just so happens to have an image of an Aloe Vera plant on the backside, which doesn't show up here very well. I traced & layered this cute little frog from a clip art image I Googled, then added her name to middle in a fun little font, that sort of has the appearance of hopping (just agree with me on this - ok?). It's called An Unfortunate Event and was free, probably at Dafont.com, but not sure on that. I tied a sheer matching green ribbon at the top and called it good.

We're also giving her an Attic Treasures stuffed frog that looks more like a vintage style than kiddie-like....

...and this little wooden spool ornament I made. (yeah, I have a TON of lights on my tree)
paper craft, scrapbooking, ornament, teacher gift, Christmas

That's all for today. Keeping it short & sweet since I have some more projects to finish and the one is not going well at all. I'm on my 5th try to make it work. It's supposed to be a Christmas present that a customer is purchasing. Needless to say, I am NOT happy that the easiest part is now my biggest headache! That hard parts are all done & turned out beautifully.

Have a WONDERFUL Christmas (in case I don't get back on here before THE big day!)

Photobucket

Mar 16, 2012

Spring Fever?

Has it been crazy warm in your area lately? It sure has been here. We've been in the 80's this week, which has been breaking temperature records from 1995 that had us in the mid 70's then.

I have quite a few flowers in bloom here this week. That's highly unusual for my northern Indiana location.

 This is my Hellebore flower and I noticed that it has reseeded!


bloom, spring, flowers
 I forgot the name of this cute little flower, but it's a woodland wildflower that I discovered.


spring bloom,
 This is some kind of Iris, but it's not Siberian (I don't think) I can't find the tag to them for some reason.


bloom, spring,
These are something called Pink Giant. I just planted them last fall.


spring flower, zone 5
 This is one of my favorites! I think it's called Scilla or Squill? It's not open just yet, but it might be at the time of this writing. They're so pretty planted in front of yellow Daffodils.


zone 5, spring flower
One of the few basic yellow Daffodils I have. Everything else is pretty much a special variety. Dafs are one of my favorite flowers and I can't seem to have enough of them. They smell wonderful when you get a whole big bouquet of them in a vase.

So, enough of my early spring show for now...

Now, let's get on with a super easy project I conjured up on a cold day, just waiting for the springtime. I only needed a pair of needle nose pliers!
We'll start with a somewhat old crackled glass vase I purchase back when I was married to my first husband (we've been divorced since 1996). It used to have a bunch of teal blue colored glass flat marbles in it. I don't recall how I managed to break it. Luckily, I was able to glue it back together, since it's crackled already, you couldn't see the break lines very well. Over the years, the glue has yellowed and I've grown bored with the piece. I've saved the teal blue marbles for some project later on down the road and this just sat in my craft room, waiting for it's own repurposing event to happen.


Then, last year I came across this box of acrylic pendants at a little shop I like to check out once in a while for unique and inexpensive items. I know these pendants were quite a bit cloudy, but I didn't care because I knew they'd be used for something outside and that would happen anyway. I didn't want glass ones either. My glass stuff outside always seems to get broken. I couldn't believe I could get 6 of them for less than $2? Hello!! I bought 2 boxes of them, but I only need ONE for this little project.


Next we move onto some crackled glass ornaments that are a tad on the larger-than-normal size. I had other intentions for them for  Christmas decor outside, but they were so heavy that I was afraid to use them for fear of them hitting the brickwork on the side of the house and breaking. I bought them half off way back when (before gas prices went nuts...) I have nothing that comes to mind to compare the size of these to, but they are larger than a softball & the tag says it's 5 inches. Even at full price, they were reasonable in price compared to today's standards!
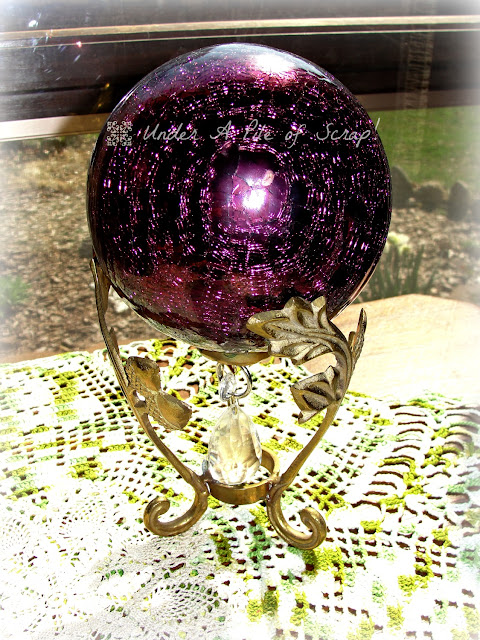

repurpose ornaments, garden art, outdoor decor, spring garden
I had a hard time getting a decent photo of this, so you may have to stare at it to notice the dangling pendant below the ball. It's hanging from the ring on the ornament. The ring needed to be a little smaller and so did the rings on the pendant. I took the small round piece off from the teardrop shape so I could put it inside the ornament ring. This made it shorter, otherwise, the pendant sits inside that round part of the brass base and you don't see it. They still don't fit quite right, but nobody's gonna be up close enough to probably even notice them hanging from it in the first place. Just me. All I needed the needle nose pliers for was to get the metal hanger off of the pendant because it was pretty durable!

So now I have this pretty & petite gazing ball that I didn't really have to do anything to in order to make it. My favorite kind of projects!


In case anyone is wondering, the variegated green crocheted doily that you see is out for St. Patty's Day and it was made by my husband's late grandmother from Germany. It wasn't my first choice from her collection, but I DID mention to my husband's aunt that I liked the color green, but I was referring to the "emerald" green stemmed goblets she had. That'll learn me! I just need to find a more suitable vignette to display it.
...BTW, I did get the goblets too.

 Photobucket 
I will be linking up to the following parties here and ones listed in the Left sidebar:

Nov 7, 2011

Wheeeeeeew!!!! Pic heavy post

I am breathing just a little bit easier today, but not much - I have to make more stuff for this Saturday's show too. I had my first craft show on Saturday and I have to say that the show was a phenomenal success!  My only disappointment was that I didn't take more stuff!! I never thought I'd hear myself say THAT! I took less than half of what I did last year and make almost as much!! Now THAT'S how ya do it!  ;^) I can finally show you some of the things I made for the show, since every one of the specialty items that I was holding back on sold.


Here are some of the signs that I made that sold. They were each made from a cabinet door. The lettering was all done with my Cricut. This first one was made using the Billionaire cartridge.


This was made from a really cool looking large fishing lure that has usable hooks. The font used on this was one of the early Cricut carts called Stamped. It has a rugged primitive look to it that I really like. The little story behind this one and the next is that my husband is so "over" seeing the "Live Laugh Love" quotes on everything and just made a little joke about how I should do that with these fish signs, but put Fish in there for the last word instead. I thought he was onto something there, so I went with his idea and they both sold. The funny thing is, I had these for 2 years now without being on a sign & they obviously wouldn't sell, so it was a good gamble that paid off. And yes, I charged even more for adding the sign work. ;^)


Sorry about the poor photo quality on this image. This is another large fishing lure and it also had the same Stamped cartridge used for the font, with a slightly different quote.


Sorry again about the bad picture quality. This is a wooden box that was originally painted creamy ivory with foam stamped Christmas trees and heart on it. This is what it looks like after I finished distressing it and adding some cute canning jars with candles, painting the lid rings a rustic brown and adding some greenery with berries. 


When I found this, I thought it so cool and so BIG for a tea strainer ball in the shape of an acorn. I painted it with some metallic spray paints to actually look like an acorn and added some more cute greenery with berries. Oh! And I put a little jingle bell on the inside too!


Here is one of my pride and joy creations. I just love how it turned out! It's a Holiday/Winter themed birdhouse on a rusty and distressed pitchfork that I found at a flea market. The handle was broke, so my dear sweet hubby made me a post and being on the frugal side that he is we are, he used a piece of oak log we already had instead of buying a 4x4 post. He has  a ton of some other left over lumber and made some decorative top and bottom caps and I painted them. It drew quite the attention at the show, but didn't manage to sell until much later in the day.


Here is a small Dutch shoe I found last week at the local Salvation Army. They only had one, so I made it  into an ornament. I was kind of perplexed on how to go about doing the design since the hanging hole is on the one side of the shoe, it causes it to hang at an angle. So I put the larger snowflake design slightly off center and did the border around the opening. It didn't sell though, but I love the colors.


 My friend and I have our booth space(s) on the stage in the facility that holds the show. Here is one corner of my portion by the stair entry. My hubby made me a large pegboard display wall that works out really nicely for my signs.


This one is hard to really make out since it overlooks the main floor booths, so it's hard to  make out what's my stuff and clutter. I didn't take nearly as much as I should have, but it worked out good and it was less that I had to carry back home!


This is another one of my tables that was next to a walkway ramp. Again, I didn't have enough stuff to fill my area, but at least you could see everything I had. (And no, I didn't miss a word on the chalkboard, it was hidden behind the star organizer.)

 I even had customers request that I make some additional items for this week's sale. One lady remembered the ice skates I made last year and wants one. Another lady wanted me to make another faux grain sack pillow for her. It's almost done and the skates are half done.


This is a sign I started to make for the last show, but it got messed up in the process and the "patches" didn't help, so needless to say, it didn't get to go with the rest of the group. However, after a little thinking and another discussion with the hubby, he sent my little ADD brain in another direction than he was actually going and I came up with really good fixes!

How do you like it? I think it's very striking. I'm trying to decide if I should change out the rusty jingle bells for red ones instead. That was my 8 yr olds suggestion anyway. You see, when I did the masking for the letters, some of the painters tape peeled off tiny bits of the white paint. Grrr! Hubby told me to touch up with the same spray paint using a brush. It worked OK, but not great by any means. Plus, I must not have had the tape down good in a spot on the frame and had a bit of the red paint bleed through onto it. Ugh! Well, I had some sparkly white snowflake buttons from my scrapbook stash and used those to cover up the dots and I used the red and white rope cording to fill in the ridge that had the red paint on it. You can hardly tell a thing. It's still not perfect, but I think it's good enough to make it's debut for the next show!


Here is another sign screw up I had that I managed to re-invent the night before the show. This one was a total mess before it got to this! I won't even bore you more with what all went wrong with this poor thing. BUT! I think I did it justice in a delightful way. I like it so much, I might just make one for myself too! This one sold early in the day. The letters were again cut with my Cricut using the Cindy Loo cartridge.


OK, so this was long, but I had lots of photos for you to see. I know it's been a little while since I've shared anything worthwhile on here and as much as I would love to spread it out through the week, I have more things to get made and a lot of space to fill!

I am linking up to these parties: Funky Junk Interiors and Chic On A Shoestring and Coastal Charm
and House of Hepworths


God Bless and have a great day!


Photobucket
Related Posts Plugin for WordPress, Blogger...
