Showing posts with label furniture. Show all posts

Apr 10, 2014

Fancy Smancy Frenchy Table

Gee, I haven't posted anything new since 2013. Oh, I've started at least 3 new posts that never got finished, and now here we are into April. Time sure does fly!

You can usually tell my excitement for Spring by my anticipation for blooming flowers in my gardens, especially after the long, snowy winter we've just had this past year.  

We STILL have a 2 tiny piles of snow left in our yard, & no, we didn't just get hit with that snowstorm that Minnesota & the Dakotas (& Canada) just got a week or so ago (thank you Lord!)


Of course, these piles are from the massive piles that my husband created from plowing our driveway & we live in the woods, so the shade from the trees help to keep them around even longer than usual.

I do have some very tiny flowers blooming right now, so that's good to see!


These little blue ones are some escapees that I need to transplant somewhere else. I've learned that these will spread like crazy if left unchecked! I want them by the edge of my woods, behind my garden shed where they can just "go to town!"
early spring flowers


My poor looking Rhododendron tree took a hard hit from the long term freezing temps. It's looking pretty rough! I wonder if I'll get very many blooms on it this year? It's never looked this bad in the 11 years we've lived here.
Frost bite on Rhododendron

This is what it looked like last year in 2013, I guess we'll see what May brings for it.


However, as much as I LOVE to see my plants and flowers emerge in the spring, there just might be one other thing I love a tiny bit more....
 *
 *
 *
...GARAGE SALES!! 

In years past, it's been warm enough once in a while that there might be some as early as late March & even more in early April. This year, nothing in March in my small town. But there was one yesterday in a nearby town. I tried to be good & not go there, and I didn't! Buuuuut, I learned that my sweet hubby was working in that town & it just happened to work out that he was able to go scope it out for me at the end of the day. I'm sure there was more there that I would have probably liked, but what he sent me pictures of with his phone was enough. 

He found a wicker-like birdcage, a pitcher and bowl in a wash stand, and this beauty!
Fancy coffee table, French coffee table, table with inlay


I had no idea the table looked this pretty based on the photo my hubby sent. It had pillows sitting on one side & a throw on the other & it was far away, so I didn't notice the inlay detail.


It does have a repair that looks easy enough to take care of. I've dealt with worse.

I had my husband do a little wheelin' & dealin' on a price for everything - a little "bundling".... you know, American Pickers style!

I want to get started on this piece right away, because I have an Artisan Market on May 3 that will have the kind of clientele that just might be in the market for something like this. I'd love to keep it myself, but I don't think it's a right fit in my woodsy, rustic home. Well, I could if I wanted to redo the entire living room over, which would be much to my husband's dismay.

So keep your fingers crossed that you'll get to see a post on the finished table! (and maybe say a little prayer that we have great weather for the artisan market too)


Photobucket

Sep 6, 2013

Another Chair Make Over


Hey there! 

Remember me??

I know, it's been a really long time. As in MONTHS.

It's been quite a summer for us this year. We haven't done much swimming in our pool because of the rainy & mostly cool weather, so I'm not even sure why we opened it this year, other than the fact it needs a new cover for next winter.  It wasn't until after Independence Day when we finally opened it up & my daughter has only swam in it twice.

We've had quite a major time hog with a project that we've been working on since early May, but I can't disclose that just yet.

The other time hog has been taking our daughter, Brooke, to rehearsals, literally since the day after the last day of school in May. She was in a local production of Joseph & the Amazing Technicolor Dreamcoat as part of the children's choir. 

 
They are now done with their 6 performances and I have to say it's been a fun ride and an amazing experience for all of us, in spite of the time & fuel consumption! I'm so very proud of my daughter and the entire cast of crew of this show. They had put on an AH-mazing show all 6 nights. 


 This is the Pharaoh, the guy who played him was awesome & the audience loved him!


This was from what is called the Megamix at the end of the play. Check out "Joseph's" guitar glasses (far left). If you can pay close attention to the blonde haired boy in the green shirt, you may get to see him in an upcoming Disney movie that was being filmed in a nearby town. He was an extra in the movie & was even chosen to play a small part in the talent show portion. This little boy is really something & quite a little entertainer!
 
 
They got better & better with each performance. They received standing ovations every night, as well. Even though it's been quite time consuming for our summer, our entire family has loved every minute of this new "adventure" & wouldn't have missed it -  with that being said, we're also glad that it's finished. 

That's just a little bit about our summer...

I have been working tons of craft projects during this time as well. I hadn't gotten many photos taken of them before they were sold, which is a good thing in a way!

I did come across a vintage chair at a garage sale recently. I already have more chairs to redo than I know what to do with, but the price was crazy cheap & it only had a small flaw that I would end up creatively camouflaging. 

furniture, chair, prim


I replaced the padding on the seat and recovered it. In the meantime, I painted the chair black & did some light distressing.

Since I like making things that force me to "think outside the proverbial box" I wanted to add a little extra something out of the ordinary to this chair.

prim, primitive, crackle paint


I crackle painted the top brace & stenciled the quote "Faith Hope Love" with some small prim stars in between. Also, if you look closely at the lower right point of the star in the circle, there is a chunk missing. I added the metal star to draw your attention away from the flaw. I started with a larger star that completely covered the missing chunk, but the first time I sat on the chair to check for comfort, the belt loop on my jeans caught a point of that star & bent it all up. Start over - use smaller star.


I have been making so much stuff lately that is black & more prim looking. I have a customer that really likes that look, so I've been working several pieces for her. She didn't purchase this, so it's going in my "shop" (Rustique & Chic).

So, for those of you wondering where I've been & what I've been up to, that's basically it in a nutshell. Hopefully my next blog post won't be a whole season from now.


Photobucket
Parties I'm Linking to:


May 30, 2013

Have You Had Enough of the French Post Mark Tables Yet?

Graphics Fairy
Courtesy of Graphics Fairy
click on image to go directly to her printable version

This has been one of the more popular graphics that Karen from the Graphics Fairy has had over the past couple of years. I know anyone that sees it on my projects just go CRAZY over it. I have to admit that it's also one my own personal favorites as well. 

This was the first table I used it on. 
room decor, painted furniture, chalk paint, home decor, farm house, farmhouse styles
I apologize for how dark the photo is. This table sold in the first hour of the craft show I had it in, and I think I could have sold it a dozen times over that day. If you want to read the story behind it, feel free to go check it out here.

I figured I was onto something after all the rave reviews I received on that first little table. 

So I made another one, and that one proved to be a phenomenal success and I'm kicking myself for selling it (I knew I would). It has been repinned so many times and still continues to be every single day. If you want read about how it came to be, you can read my post from last year here.
room decor, farmhouse style, farm house, farm house styles, painted furniture
The table itself was a great style to begin with, and adding those vintage metal accents just took it over the top.

I used the freezer paper transfer method for both of these tables and it worked fine for the most part, but I found it limiting and I didn't always get good results, which required me to quickly wash it off. My printer has waterproof ink, so if it came out a flop, then I have to be quick with window cleaner to remove it before it sets.

I contemplated getting an overhead projector & I even found one for sale cheap, but being basically lazy like I am, I didn't want to go that route, because you have to trace the entire design by hand each time. Nah. Not for me, plus I have to have some place to keep a large projector. I think I may have mentioned a time or two that I have some slight hoarder tendencies...hence my blog's name "Under A Pile of Scrap!" and there's just no place to keep one here - and they're a bit heavy.

My next idea was to use my new Silhouette Cameo that my darling son got for me for Christmas. He is such a sweetheart & so generous.

With using the Design software upgrade for my cutter, I thought if I could trace the design and kind of clean it up a bit, it might work out better than all the other options. Then I can save the design once all the initial effort has been put into it, plus, I can make it any size I want (for the most part anyway) without having to reinvent the design every time. I just cut it out with contact paper or stenciling vinyl that Silhouette now offers.

Can I just say that I hopefully never have to resort to the old way again! Not that this method is perfect either, but it's easier to get the results I'm after than the others.

But this post isn't just about creating the image to cut with my Cameo. It's also about how I made a table out of 3 different things.

You see, I sold the table that I'm kicking myself over to an acquaintance. She loved it so much that she asked me to find & make her 2 more tables, only they can't be any wider than 18"! Really? 

Ok.

I thought I found 2 tables, but one ended up being a total nightmare & I notified her that I gave up on it as a table and will have to find her another one. And the other one? Well, I didn't really find her a 2nd table, but I had a plan to create one out of bits & pieces I had.

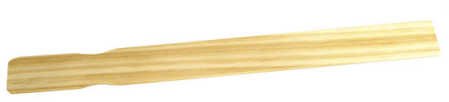
The top was a just one of those lightweight pine trays that sits on a criss-cross wooden TV tray type base. The legs used are from some sort of little bench or seat that had a ripped out cane seat. I felt that tray was just a little TOO lightweight to use as a side table, so I decided to add some stability and, if I'm lucky, create a more rustic look to it by adding.....
.
.
.
.
.
....these

Paint Stir Sticks

Yep. The longer, thicker ones. I got them at Walmart.

I seen them being used on some other projects at a few blogs and on Pinterest (of course). These were the perfect thickness I needed and if I was lucky, which I'm usually not, they might be the perfect width to fill the tray, without having to cut any lengthwise to fill an odd gap. Guess what? 

I was LUCKY!

It's a tedious job and for those that have made the amazing herringbone designs with them - I bow to you and your determination! I had to test each one out in the tray, as some had a slight bow to them and needed to placed just so or replaced with one that would fit properly. Then they had to be sanded individually, then stained, keeping them in proper order the whole time. 

Next, I glued them in place with E6000 glue, except for an inch on either end. I did that so that I could add some a little more rustic look. Not sure it was the best idea, but it is what it is.

I added some dark brown tack nails at the ends of each strip. Since the paint sticks are thin and I was nailing so close to the edge, I needed to drill pilot holes for each one so the sticks wouldn't split. I forgot on the to do that one on the first stick & realized it was splitting.

So that I could keep the tacks in a straight line, I first put down a piece of painter's tape to use as a guide.

After all that, I finally applied the Postmark image that I worked so hard on to perfect. There's lots of tiny detail weeding to do on this image, but the end results made it worth it.


graphics fairy table


If you look closely, you can see where my husband got just a little carried away with getting the tack heads set flush and some are actually more recessed than I cared for, so I had to go back and touch up those spots with more stain so they're less noticeable. 

The blue design in the top left corner is not really that bright blue, but I just couldn't get the color adjustment right in Picmonkey.


tutorial, home decor, room decor, farmhouse style, farm house, rustic, shabby

I painted the base using home made chalk paint, then aged, distressed it & waxed over the entire piece.


postage table

I don't think this will be the last Post Mark table that I'll make and I think my customer is just as thrilled with it as the other one she purchased from me. Since she wants one more smaller table, I'm on the hunt for one more.


Non-furniture related topic...

...today is my daughter's last day as a 3rd grader and it's her first night of rehearsal in the children's choir for the play Joseph and the Amazing Technicolor Dreamcoat. She's so excited! I'm also going to try my best to go have lunch with her today. PB&J's! Yum!

Photobucket 

 Parties I'm linking to:

Funky Junk White Party

Furniture Feature Fridays 

May 21, 2013

A Pretty Garden Chair

I kind of want to call this post my "Un-Craigslist" chair find. I choose to give it that name based on a recent encounter with a Craigslist seller that pretty much left a bad taste in my mouth (& he wasn't the first either). If you want to read an entire post about it, you'll want to go back to my March 27th post. Since I tend to go on & on about things enough as it is, I won't bore you with repeating that story here.

But, I do have some good news! I did manage to have a BEFORE picture of this chair. If you read my blog enough, you know I'm really bad about getting, or finding Before shots of the things I refinish.

Craigslist furniture
There is actually 2 chairs that I found at the curb of the before mentioned Craigslist deal gone wrong, along with some other things you see here.


I just want you to know that I braved the mosquito infestation this morning to take these pictures. I think it was the quickest photo shoot I've ever done.
painted chair, furniture, painted furniture, garden, summer decor, spring, diy,

The one I worked on first is one that had a broken leg brace. So I fixed the break & decided to make it a garden chair. The chair is still pretty sturdy, but I don't want to take that chance with anyone's safety, but it will hold a heavy planter of pretty flowers just fine.

I wanted to make it bright enough that you could see it out in someone's garden or a shady porch (like mine-not shown). 

decorative chair

Using my Silhouette Cameo cutter, I made this design. I've always loved the quote "Time Began In A Garden", because my husband always thought that me having flower gardens was kind of senseless & a waste of time. I felt it was necessary to remind him of where time began. He doesn't say that anymore.

painted chair
I think this scroll bracket was a freebie from the Silhouette store a little earlier this year. Did you know that they offer one free design each week? They choose the design, but they do pretty good about selecting decent ones. Anyway, I felt this one was perfect for the front of the seat. It fit the curve nicely without getting blocked by having a potted plant or vingette sitting on the seat. 

The blue is more of a teal blue color and I just used a Glidden sample bottle that I got at Walmart. The color is WGB09 Deepest Aqua. The green is an Apple Barrel brand acrylic paint in Pale Green, also from Walmart.


I love those set-back spindles and I wanted to accentuate those by painting them in the green accent color.


furniture
If you look closely, really closely, you can see the break in the "cr" letters of the word Scrap in my watermark.


stenciled furniture

I traced the Petunia/Morning Glory image from clipart I found online, as well as the butterfly, in the Designer software add-on for my Silhouette.


The font is Guttenberg MF and can be downloaded for FREE at Dafont.com.
chairs


This is just a close up of the white accent painting I did in the grooves at the back of the chair.


I sprayed the entire chair with Krylon Clear matte spray sealer and called her good and took a day of rest (actually I didn't rest, I have more projects to finish).


This project has been featured at these blogs:

PJH Designs
PJH Designs


Photobucket Parties I'm linking to:

PJH Designs


Furniture Feature Fridays

Ivy and Elephants


Related Posts Plugin for WordPress, Blogger...