Showing posts with label home improvement. Show all posts

Jan 20, 2012

Kitchen - Small Update; HUGE inpact!

I haven't really talked much about our home. It's a very nice home .... at first glance. It's one of those great First Impression homes. When you first see it, you think Wow! What a cool place! If you lived here, you'd have a totally different story. I showed you the Austin Powers carpet that's in my laundry room here. I'm pretty sure it's original to house from when it was built in the late 1970's, as is the beige shag carpet in the living room and dining room. That one is tolerable for now, but will also being going buh-by in the next couple of years, now that our daughter is at a more responsible age.


I showed you the little lighted display cabinet we did a year ago in the kitchen. I love it!


We've had & still have several storage dilemmas in our house. It has no secret hiding places basement or attic.  We're forced to be a little creative, and let's face it, we're not all that great at having the funds to be as creative as we want, even in our thrifty world.


However, we get lucky sometimes and things work out like that's how it was supposed to.


Let's see if I can explain this. We have a lower kitchen cabinet that is on one side of a corner, but not a lazy susan cabinet. (sorry no pics, but our cabinets are fugly and I'm not showing the world until they look better.) The inside of this cabinet goes waaaaaaaay back to the wall. It's basically dead and wasted space. You practically have to crawl in the cabinet to get anything that has been shoved too far back. I don't know about you, but I'm on the back side of 40 and this ol' gal can't crawl in a cabinet anymore. My daughter could get back there, but too many mysteries could be lurking back there in the dark. know what I mean? eewwww!

We had many discussions on how solve that problem. We came up with the idea to see if we could create 3-4 panels that would match the dark walnut finish. We could make the necessary one be an actual functioning door, while the others were just for decoration. I wish I had some Before shots of what it looked like, but I wasn't THAT into blogging so much a year ago and it was just a strip of smooth paneling.

We went to the local Habitat for Humanity ReStore to see what they had there. We had just been in there a couple of days earlier and they didn't seem to have what we were looking for then. But this time we figured, what the heck?

Wouldn't you know? They had FOUR dark walnut cabinet doors with no holes drilled in them in the perfect size! Right out in front and only $4 each!! At that exact moment, the clouds parted and sun shone down from the heavens and I heard Angels sing. Well, maybe not so much all that, but it was a glorious moment!

You'll have to excuse my photo taking skills, or lack of them, but here are the panels as they look now. Not to mention that it's not a good light day here either.


This is the only functioning door and it lets us get easier access to that area and it's no longer a scary place.


My hubby even put in 2 outlets to accommodate some cheap nightlights so we can see what's in the cabinet better. One for each shelf.  Oh, and he didn't finish off the edges of the opening or anything fancy, it's purely functional here. However, someday I'd like to add something dimensional to the centers of each door panel.


So, if you have a dilemma like this and you have access to the backside of your cabinets, add some doors. It's easier and cheaper than putting in pull out shelves...which I would love those too. ;^)


God bless and have a great day!


PhotobucketI'm linking up to these parties:


Jan 3, 2012

2012...looking forward


Ya know, even though I have given up on making New Year resolutions, I still think of the goals I'd like to accomplish in each new year.  Sure, I'd like to let by-gones be by-gones, but some things are not meant to happen until it feels right. I think when that person is dead is a good time for that. LOL!!  OK, just kidding. well sorta. I like to make more interesting goals. Not that burying the hatchet isn't interesting, it's not always easily accomplished if the other person isn't just as willing.


BUT! Hatchets aren't what this post is about. I want to talk about the goals you set for yourself to make improvements in your life. Eating better. Organization. Live more. Stop Smoking/drinking or other self destructive habits. I was a smoker in my younger days. I've been smoke free for 12 years now. Sorry, again I've went off on a tangent there. This really isn't a fire and brimstone blog post - really! It seems to be taking that tone though, doesn't it? sorry.


What I really want to say here is that I am hoping that we can make some major home improvements this year. These are really big dreams, considering my hubby's new job keeps him super busy and working late many nights. That's about the only thing he doesn't like about his work. He loves it otherwise and they treat him great!


I am happy to say that we actually had some time this weekend to discuss starting a somewhat major remodel project this year. You see, even though our house is kind of large, (3,400 sq. ft) we still don't seem to have enough room for all our stuff. Granted, we've inherited tons of stuff from my hubby's side of the family as well as our own 2 households before getting married. We have liquidated so much, but my hubby has a hard time parting with many family items. Take blankets for instance, I think we have enough quilts and throws to adequately care for the homeless community in a large metropolis! His mother, grandmothers and aunt loved to make blankets of all sorts. I like some of the quilts and have opted to keep only the prettiest and practical ones and donating the rest. My hubby seems to think that his deceased mother is the one that will decide whether he goes to Heaven or not based on how many blankets are left in the family estate. He keeps looking for the lightening bolt out of the sky when we discuss this. I have to remind him that his momma isn't caring about what happens to these her blankets anymore up in Heaven. I'm not wanting to burn them, I just want them to go to people who will really use them and that needs them. We don't NEED 50+ blankets. There's only 3 of us living here and one college student (part timer). One smaller tote is sufficient.

Some of them aren't even this pretty (this example is from Pinterest). Some are very pretty, and those are the ones I want to keep. They weren't even made during the depression where they had to use whatever they had on hand, like the only one I have from my maternal grandmother. I'm not into crocheted ones at all, and not when they have a varied mix of colors and one of those colors is black. It might be pretty to someone else and trendy some other time. It's just not my thing. I love crocheted things like doilies and pillow cases and the edges of  hankies and such with thread or floss (& we have many of those too) but not blankets from yarn. Sweaters yes. Does that make me mean? *sigh!* We have totes of blankets - big totes, that Christmas trees fit in...and more than one of those too. Have mercy on me, please & Don't judge me. I loved my Mother In Law dearly for the short time I got to spend with her. How I wish she were alive today so I could have her make some awesome stuff that I know she would be capable of. She'd probably get a kick out of Etsy!


Anyway. Back to the project(s) that we'd like to get done this year, which is kind of 2 fold. I have a good sized laundry room that currently holds a washer and dryer, an upright freezer and a full sized fridge. There is also a small cabinet in there and a small bench. There are 2 small closets with one housing the water softener. The entry into the crawl space is in the floor here, as well. Mind you, I have been wanting this room redone for yeeeeaaaaarrrrssss quite a while. It has some issues and needs a desperate update. It has some seriously shagadelic carpet in there!
Yes....this IS it!  nice.
I'm having visions of Austin Powers in his boudoir right now, all I need is some black fur. ICK!!!


E'hem, now erase that picture from your mind. sorry. Our daughter's bedroom is on the other side of the laundry wall and there are 2 large closets in her room on that wall.


These are the 2 closets.

We want to take the left half of the left closet and close it off on her bedroom side and open it on the laundry room side, so the fridge or freezer can be built-in the room making it more open. We figured if we completely reconfigured the closets in her room, we can get a full closet on her side, half of one on the other side of the wall and create a built in desk with some shelves for her in the corner of her room. I have her side all planned out and on paper it will work.


Here is my rough sketch (sorry it's so light) and a sketch artist I'm not. I can sometimes draw, but I don't try hard at it when it's something like this in 2 minutes. Hopefully you get the gist.
 
Is that clear as mud? ;^) I NEVER plan anything out because it never works out anyway.  It might be a while before I can actually get any "after" shots. That's just the way things are around here, and the hubby is extremely busy with his job. In fact, he'll be doing 3rd shift before too long, but just for a couple of weeks. But...here's my prediction. This won't happen this year. Why? My hubby seems to be leaning more towards redoing the master bath. Don't get me wrong, it definitely needs redone too! And, it's probably more pressing than what I just planned all out for you above. The bath has had lots of leaks prior to us owning the house and now it's starting to smell mildewy because of bad tub stall design. Long story, but this will most likely become our priority. It won't upset me to work on that either. Trust me. I've just been waiting for a new laundry room for 9 years now. I mean, I bought wallpaper border for this room! Hello. I'm so over THAT now.


But for now, I have sloooooowly been working on taking down all the decorations from Christmas. The majority is done, yet there is still the Christmas Village and the lights outside left to go. Wouldn't ya know, we get the Christmas snow the day AFTER New Years. Now it's just an annoyance to me. LOL! My daughter loves playing in it, so that's good that she goes out more now than in the summer. She HATES bugs and that's just a given here in the middle of the woods.


Sorry for the long drawn out post that is probably pretty boring, but at least there's pictures! LOL!! Sometimes I rattle on with no visual aid to break up the monotony whatsoever! LOL!!


God Bless and have a great day!
 Photobucket

Jul 5, 2011

Another outdoor project complete.

We have been feverishly working away at trying to get things squared away for my son's high school graduation party this coming Saturday. Things are not complete & perfect around here & I'm sure they never will be. That's just how we are. human.

Anyway, we did manage to get half of one of those little projects done over this holiday weekend. Notice, I said HALF done. Yes, it is a rare occasion that any DIY project ever really gets 100% complete at my home. There are some, but they are few. They get mostly done, at least to the point that it can sort of look like it's complete to the naked eye, but upon closer examination you will notice that there is no baseboard trim or the trim piece between hardwood floor and carpet. Things happen that just prevent us from being able to finish what we start sometimes. It's either a lack of funds or a scheduling conflict that brings the project at hand to a screeching halt.

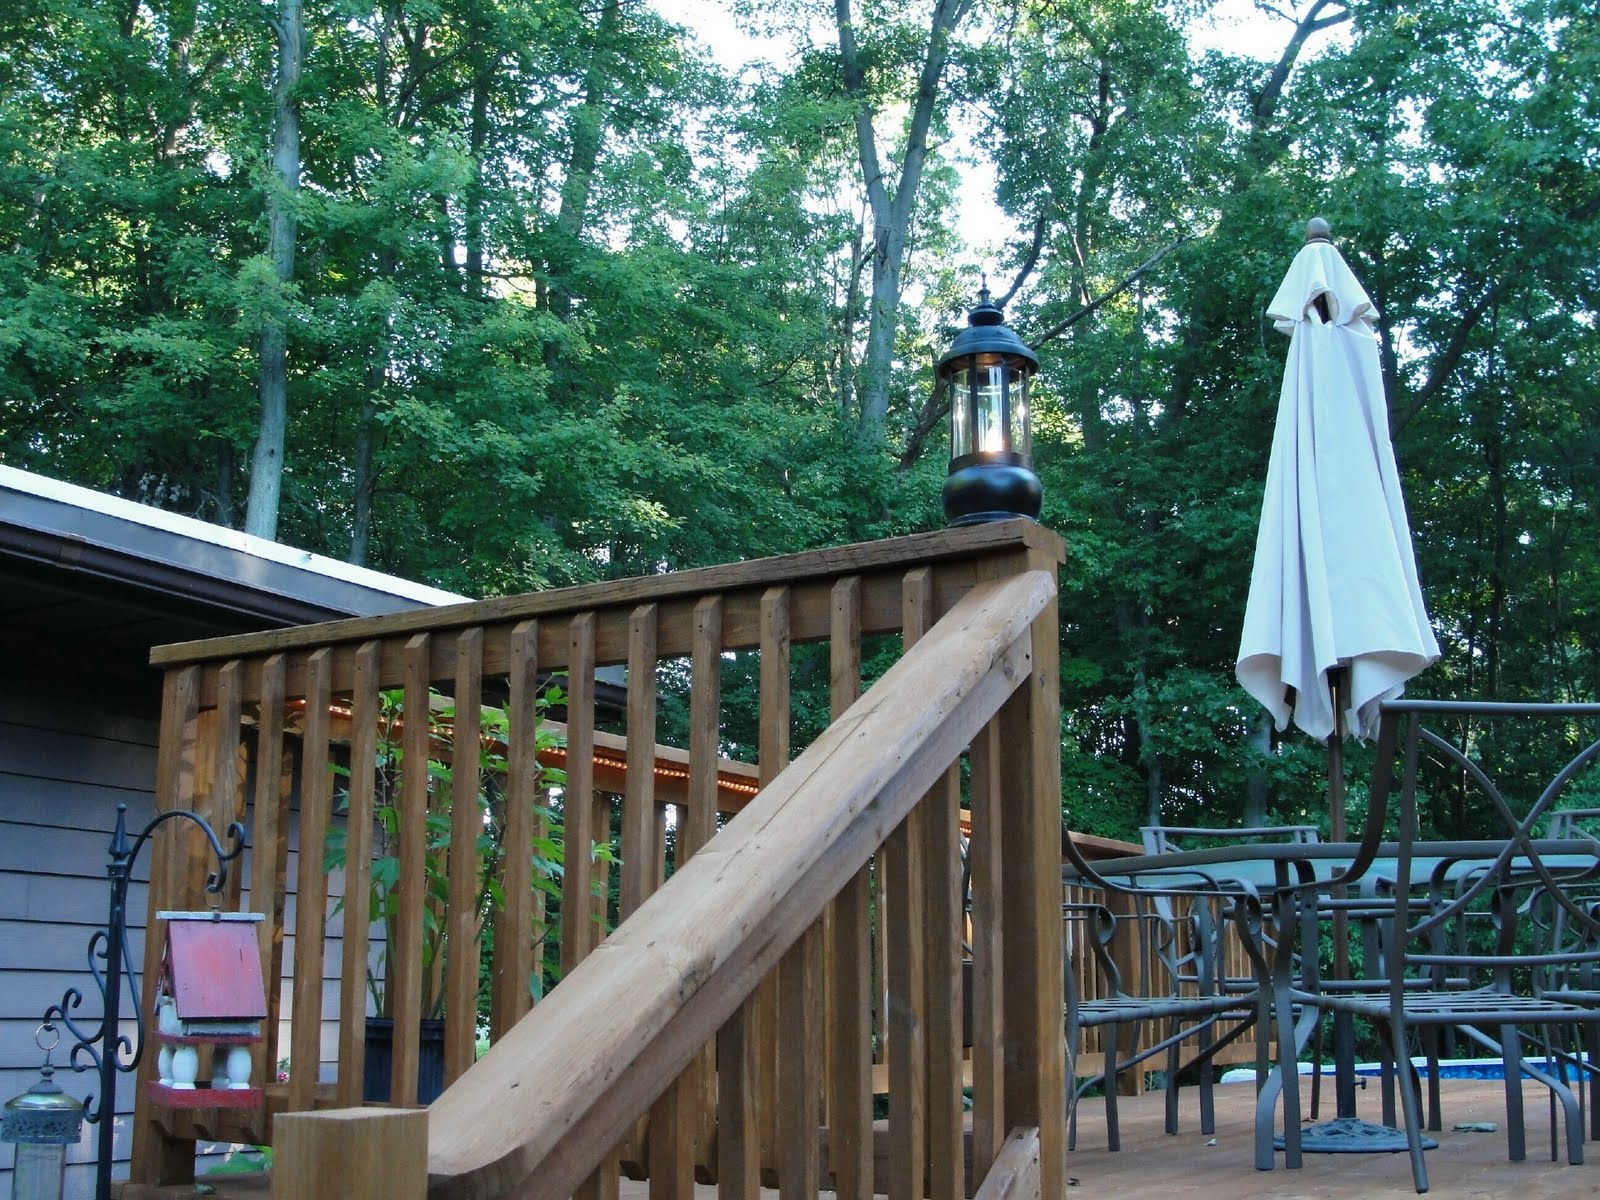
Well enough about that. Man, do I babble on or what? So we had purchased 4 candle lanterns maybe 2 years ago on clearance for $11 each. We thought that was still expensive (yes, we are cheap..e'hem "frugal") but compared to the $30/ea. we thought it was a good deal, especially considering what we really wanted to do with them! I was just thinking out loud about how cool they would look as lanterns on our deck if they were lights instead of candles. Of course, my hubby is very handy in all sorts of things. He said he could probably make that happen,s o we got them & they've been patiently sitting around for their debut. Two of them get their grand appearance to the world this weekend. The other two are going to have to wait for the other stairway some other time. I'm sure it won't be this year.....(picture rolling eyes here). The lanterns were originally a grayish green painted patina that I painted a satin black.

This is how they look with the lights off. We haven't put the cushions on the patio furniture yet because we don't want it getting wet before the party.


This is how they look with the lights on. Since I just took the pictures this morning so you don't get the full ambiance of them in the dark.


This is a view with one of the lanterns on, but you can see the rope lights on under the railing too.


We mostly have the yard work done, except for what will need to be mowed & weed eated right before the party. YAY!! Isn't it funny what it takes to light a fire under your butt to get things done that have only been put off for years??? This is part of why I have parties, so we can get stuff done that needed to get done a long time ago. LOL!!

I have also been working on finishing up recovering the cushions to my glider rocker that I've had since I was pregnant with my son. So far, it's coming along OK, but I'm intimidate by putting the old zipper in the new cover. The cushion is shaped funny & it's throwing me off. I guess I just need to do it!

I also need to most likely finish that other mini album I'm making because I invited the grandmother of the girl I made it for so that she can take it back with her. I'm not sure why I do some of the things I do to create more stress in my life, but that what I do!

So, with that, I will say adios. Possibly for the week. I really shouldn't even be on here today, but I think I'm having internet withdrawal. *snicker!*

God Bless & have a great day!

P.S. I've decided to link up to my first link up party with this Outdoors-In project at Funky Junk Interiors Blog.


Photobucket

Jun 27, 2011

Our pool deck is now stained!

I don't show too many photos of our house because even though at first glance it looks very cool, it had a ton of work that needed to be done, and still needs done. Once in while, we fit in one of the necessary projects, but in most cases, we end up doing the non-essential ones instead. Human nature I guess. A pool deck would be one of the non-essential ones. We bought the pool back in late 2008, built the deck the next year because it was a cold & rainy summer. I won't go into why it didn't get actually stained last year, but instead got a clear coat sealer on it...that would be a DH issue that I won't get into (rolling eyes here). Anyway. I decided this year the deck WOULD get stained & stained the color I want. DH tried again to side track my intentions, but I was having no part of it again. So I stripped the old sealer off with the cheapo electric power washer, yes I did it all myself, well DS helped a little on the last day & that was just the floor part.


It's not a small deck & there are 2 stairways. We still have to decide what to do the cover the open bottom part of the deck. I know what I want, but it's not cheap. Of course it's not. Won't be happening this year either.

But, I'm really happy with how it turned out. I was actually shooting for a lighter color, but DH sprayed the stain on pretty heavy & it make it darker than I wanted, but maybe it will last longer that way & we won't feel like we need to stain it again next year or the year after.

I might be pretty scarce these next 2 weeks. I'm trying to get everything ready, cleaned & organized for my son's high school graduation party on the 9th of July. The invitations are sent & I started on a display board last week. I think I got the hardest part done & I managed to get that accomplished with my Cricut. I found this heart tugging poem way back when I first got internet & my son was only 4 years old. Yes, it touched me that much that I have managed to keep it all these years. I can't read it without choking up. I swear. Now all I have to do is get the photos & finish decorating it up for it's debut. I hope I can save the poem long enough to do it for my daughter's graduation too.

And so with that, I need to get some things sorted & put away & work on some projects for the party.

God Bless & have a great day!


Photobucket

Mar 2, 2011

Finished Kitchen Alcove Project

This is another project that my hubby & I have completed from beginning to end since he's been laid off from work. Which, by the way, we found out that he does not have an employer anymore, but that a story for another day....


Creating a little display cabinet is something that we have been talking about doing for a couple of years, but frankly were a little afraid to tackle because of needing to cut the brick work. We wanted to make it so we could have all the Brown Drip stoneware from his mother all in one place with easy access, instead of some pieces in one cabinet, others in a different cabinet & yet more buried way too high for me to see or reach. We wanted to be able to display them while still being able to use them. I don't necessarily care for this style of dishes, but they're part of my husband family. They do sort of go with the style of our home too, so that's why I don't make too much of a stink about them. They're just not my taste.


Anyway, this is the BEFORE picture of where the cabinet is going to go. We have this cute little alcove area in our kitchen, but it has this big bare brick wall space below it that seems to be wasted. We think the original owners may have thought about adding something there later, but never got around to it. The location for the cabinet is where the bricks are recessed in 2 rectangular areas below the alcove. Maybe you can see them in this photo.


Nice enough, right? (besides the clutter) But even good can be better.
This is the prep & beginning of the demo. We tried to keep the dust down by me using a garden sprayer to spray water on the saw blade while he was cutting. It worked really well, but there's just times that it didn't cut all the dust. It would have been MUCH worse, if we hadn't done that!


What an ugly mess....


This is my hubby trying to bust the bricks out after cutting out the design. this was a true demolition job.


My hubby was actually cleaning up his own mess!


Here it is with the metal door in. Would you believe this door was actually the original door to one of our fireplaces? The owners prior to us had a fireplace insert installed into the family room unit &, thank goodness, they kept the old door! I'm glad we found a cool way to re-purpose it to give it new life! It was much too cool to leave in a closet


This is the inside with the bottom in and the backboard, which all the wood in this project was left over pieces that my hubby hoards. LOL!!! We did buy the paint in a Glidden color, Golden Bronze from Walmart. It looks kinda like a dark butterscotch.


Here is the placement of the tiles we found at the Habitat for Humanity Restore for $7.50 & the brackets we picked up at Hobby Lobby for 50% off. I was hoping for an even more decorative style, but the selection was not as good as in years past. I guess the economy has made it what it is now. We had to paint the brackets brown because they only had one brown one in stock. I still need to touch up the screw heads and add the trim for the front edge of the shelf!


This is the tiles after the grout was dry.


Here it is completed, but before the dishes were put in. He added some lights inside too, so it's even nicer looking with those on.


Here is the cabinet filled with the dishes. We might add some other dishes that we have that need a home, but they'll get sort of hidden along the deep sides so they're not as noticeable.


Here it is in the full effect. Oh! and my hubby added a light above the alcove too. I just want to find some kind of metal wall art now to hang on the inside alcove wall.


So, we figured the cost of this lovely little project to be less than $60! Plus, we could probably paint our hallway with the left over paint, if I decide that I want it that color. We barely used the pint.


Hopefully, I'll have a fun pic to share with you all in a day or two, if I can find the time to sit down & write that blog segment.


Hope you have creative day!

Photobucket 
 This project is being shared at:
Related Posts Plugin for WordPress, Blogger...