Dec 19, 2013
Teacher's Gift with the Silhouette
Just a quick post today to share with you a simple teacher's gift that I made up for my daughter to give to her 4th grade teacher. Her teacher's last name is Hopple and even before she got married, she collected frogs, so it's kind of funny that she collects frogs AND her last name is Hopple.
It's a large bottle of Hand Sanitizer that just so happens to have an image of an Aloe Vera plant on the backside, which doesn't show up here very well. I traced & layered this cute little frog from a clip art image I Googled, then added her name to middle in a fun little font, that sort of has the appearance of hopping (just agree with me on this - ok?). It's called An Unfortunate Event and was free, probably at Dafont.com, but not sure on that. I tied a sheer matching green ribbon at the top and called it good.
We're also giving her an Attic Treasures stuffed frog that looks more like a vintage style than kiddie-like....
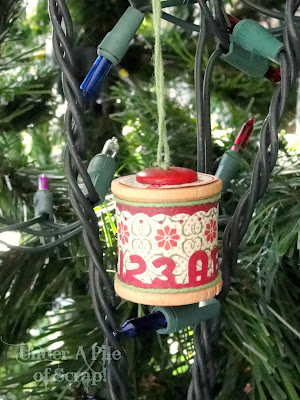
...and this little wooden spool ornament I made. (yeah, I have a TON of lights on my tree)
That's all for today. Keeping it short & sweet since I have some more projects to finish and the one is not going well at all. I'm on my 5th try to make it work. It's supposed to be a Christmas present that a customer is purchasing. Needless to say, I am NOT happy that the easiest part is now my biggest headache! That hard parts are all done & turned out beautifully.
Have a WONDERFUL Christmas (in case I don't get back on here before THE big day!)
Dec 16, 2013
2013 Christmas Mantel
I don't think I had shared any photos of my Christmas mantel last year. Maybe that's because it wasn't much to speak of, or I just didn't have the motivation to write a post about it. Yea. That's probably more like it.
This year's mantel really isn't much to speak of either, but that's the look I was going for...something simple that will carry through the winter, as I'm just now getting around to decorating for the holidays. I just put up our tree on the 15th of December and THAT has NEVER been that late in getting put up. I swear, it gets later & later every year.
Since we repainted our living room this summer in a two-tone beige color scheme from the basic (dirty) white, I wanted something that went with the room & yet was still noticeable on the darker stone wall & mantel tones.
You can see a little bit of the paint scheme to the left in the photo - just pay no attention to that horrible popcorn ceiling. We have every intention of removing that some day, but it's a huge room that will take forever and a day just to get scraped off.
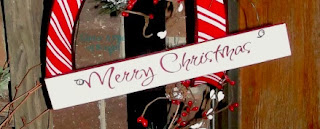
This is a sign I made for myself after I made one last year that sold immediately in my first craft show. I'm just now getting around to finishing mine up. I made it from a cabinet door that I painted & distressed, some dollar store picture frames that I painted white, scrapbook paper & my Silhouette Cameo. It's hard to tell in this shot, but I've also embossed the background paper in the frames with a Tim Holtz vintage postmark embossing folder & inked them in Tea stain with Tim Holtz stamp ink.
It's probably not a wise choice to do my mantel in such light colors because it's almost pointless to dust up there as long as we're using the fireplace insert. I can dust & there's literally dust there again in just a matter of seconds. Even though this insert is a newer one, it blows out a ton more dust than the identical one we have in another room that is 15 years old & this one doesn't blow out the heat anything like the old one does either. It's better than not having one though, I guess.
So I'll enjoy this photo of it while it's less dusty.
I'm linking to these parties:
Funky Junk White party
Dec 9, 2013
A Dicken's Christmas Lamp Post
"'Tis the Season" as they say this time of year! Around here though, 'tis the season of crafting & craziness! I barely have the first decoration up yet in the house ... thank goodness we have a wee bit of a dusting of snow outside to give you a little bit of that Christmas feeling at MY house.
I finally finished my last craft show of the year and it has been a whirlwind year for me. I was up until 1:00 a.m. the night before trying to finish some last minute projects & still didn't get a few others done that was on the list, but only because I couldn't find some of the materials needed to complete them. They've gotten "misplaced" in all the madness. I'm trying to locate them & clean up now, so I'm hoping they appear so I can finish them up & save them to have a head start for next year's holiday craft show madness. Sometimes it's all about shortcuts, even if I have to store them for 11 months. It will be a nice surprise when I discover them next year!
I already shared with you the pretty Christmas suitcase I made, which there were 3 made & sold.
Then there was the little bitty Elf Christmas tree in a wooden boot. If you missed it, you need to check it out.
Today, I'm showing off my Dicken's style Christmas Lamp Post.
I made the little sign myself & I am so happy that I was able to make that candy stripe bow...I'm not good at making bows to begin with, but this ribbon was super stiff. I had a hard time twisting it so that the white backside wouldn't show, yet not look like a wadded up mess, but I got it & I actually like it! Even my 21 year old son was impressed & he could care less about how my crafts look.
I just added some home grown grapevines, some skimpy tufts of wired greenery & the ever popular pip berries in red & white, which completes the final touches to the post portion.
I hope some of you are able to create some holiday crafts either to sell or just to add your own personal charm to your own home. Which ever it is, just enjoy the creative process.
I'm linking to these parties:
Remodelaholic
Labels:
2013,
Christmas,
craft show,
crafts,
decor
Nov 30, 2013
How about some Suitcase Christmas Decor?
Thanksgiving Day is done & over now. This year we got to spend it with my grandma since she moved back to Indiana & I enjoyed it in all it's craziness and overdosing on excellent food!
I can't believe how busy I am with all my crafting for craft shows & it seems as though the special orders have been booming as well! I'm NOT complaining, except for the shortage of time. It leaves my blog a little short on the postings, even though I
A majority of what I make is pretty much one-of-a-kind items because I work with what ever I find. In most cases, I only have one, occasionally I can get multiples, but it's not the norm.
The project I'm sharing today is sort of one of those kind of projects.
I actually had TWO green vintage suitcases that were more of the smaller sizes, like the carry on variety. I found my inspiration, where else - Pinterest!
Click on photo to direct you to the proper owner at "A Bit of Heaven" Blog. |
Using my Silhouette Designer Edition program & my Cameo, I made my design & tweaked it a tad bit from one suitcase to the other, but essentially they were the same
Surprising to me, I sold the smaller of the two at my first craft show. I didn't think anyone would buy one, at least not for the prices I was asking for them, especially in my tiny home town. But someone did & that left me with the slightly larger one to take to my next show. I never got pictures of either suitcase, sadly.
I had one left for my 2nd craft show & someone was admiring it, but decided to have a look around the rest of the show before deciding they wanted it. Unfortunately, she missed out in the meantime, as another lady bought it for her college aged daughter as an early gift. The first lady appeared upset with herself that she missed out.
Once we get home after the craft show, there's a message already waiting on the answering machine from that same woman wanting me to make her a suitcase whenever I find another green one. Then, I get on my Rustique (pronounced Rus-teek) & Chic Facebook page & see that she's also left me a message there, requesting again that I make her a suitcase. **Ya know, it makes me feel good to know that someone LOVED something I made so much & that they had that much regret for missing out & that they are so determined to get one. She didn't even care if it wasn't until after Christmas before she got it.
I told her that it was going to be a little while because I have prior orders & the Thanksgiving holiday weekend with family in town before it would get finished and she was good with that.
I ended up getting started on it immediately for fear of running into problems & delays (that's a typical day for me). It ended up going fairly smooth & I finished it ahead of schedule.
I do love how it turned out & I even did a better job on the bow this time.
I'm beginning to think I need to have a suitcase of my own to keep!
I'll be linking this project over at Remodelaholic's Anonymous Link Party...so go check out some other amazing ideas!
Parties I'm Linking to:
Nov 1, 2013
Simple Little Elf Tree for Christmas
I'm in the Christmas crafting mode for that ever loving holiday craft show season again. In all the crafting & painting craziness, I'm trying to remember to take pictures.
This little tree is one of those like soooo many of my projects where I buy something without having the first clue of what I'm going to do with it. So, it's sits around waiting for its destiny...some day.
This tree started with the little wooden boot. A friend pointed it out to me at a sale & thought I might be able to figure out something to do with it. I hadn't the foggiest idea at the time, but it was small & so stinking cute that I didn't care. It's made of wood & it turns out that it was hand carved by a somewhat local craftsman. COOL!
One day this past summer, for some odd reason, it just hit me that I could use it as a base to put a small tree in. I thought it looked just like a Santa boot, so I painted it black.
It still needed something else to make it a little more interesting, so I broke out my trusty Silhouette Cameo & made the whimsical "label" on the side.
It has a bit of a primitive or rustic look to it instead of the predictable child-like feel that you may likely associate more with elves. It only stands about 8 inches tall, so it is pretty small.
It's simple in design, because I'm just not good with decorating trees, which kinda fits in there with flower arranging - same concept. I put in some dark red pip berries, some handmade tea stained chenille candy canes & some home spun ribbons tied on. Never mind the red string at the top. It was an experiment that I forgot to remove before taking the picture. Lastly, I tied on a rafia bow that streams down & I attached a rusty snowflake in place of a star at the top. See? Simple!
It probably took me just as long to decorate this itty bitty tree as it does a 7 ft. tall one! Nope. I don't work fast.
Parties I'm Linking to:
Oct 19, 2013
My Simple Fall Blocks
I found this idea on someone's Facebook page that I had come across. I wished I would have saved their page, because if I remember correctly, they had some pretty cute things. But once I saw these, I forgot about everything else ... I was on a mission. I had to go outside & dig out the pieces of scrap wood my husband cut from odd sized trusses he couldn't use & threw out in our burn hole the night before. He always seems to shake his head when I start pulling things out of the burn hole. LOL
I painted the blocks orange first & then lightly sanded the edges & rough spots til they were sort of smooth with my cheap hand sander, but you could do this step by hand if you don't have a little hand sander.
Then I had a big bagful of small wooden spools I picked up at a flea market a few years ago. I almost put them in our garage sale a couple of different times, but talked myself out of it. Good thing!
I painted the spools brown & kind of sanded the edges of those too, but sanding probably isn't necessary. You could paint them green if that suits you more. I tied a few strands of rafia around the spools. Nothing fancy, but it does add a little something extra to the look. The other lady used dark green rafia on hers. I screwed the spools onto my blocks with drywall screws, but the original ones had just hot glued the spools on, so you don't really need anything out of the ordinary to make these.
I used a different font than she did too, but it isn't really that much different. The letters are stenciled on in the same color of brown as the spools.
You can use what ever font you like to make it yours.
Here they are, along with a sign I also made using the same colors, & some fake pumpkins. Truly nothing fancy here!
So if you're wanting to make a simple, yet cute fall craft - this just might be what you're looking for.
I'm linking to these parties:
Funky Junk
Labels:
2013,
decor,
fall,
painting,
primitive,
Silhouette,
thanksgiving,
wood
Sep 17, 2013
My Own Fall Wreath
I have to say that I don't really decorate for holidays, except for Christmas, but I do put out a few things that relate to whatever season we're in ... & I don't go for cutesy so much.
I'm also not one to go around saying that I can do flower arranging or wreath making either. I know where my weaknesses are and these are just a couple of my
But I tackled a fairly simple Fall Flower arrangement in my "Fall Decor & More" post, which didn't really have much decor or any "more" in it. I guess writing blog posts is another one of my deficits. However, I was pleased with the end result of how that flower arrangement turned out.
My next little project was adding some fall decor to a twig wreath I had. I have to say that I like the way it looks, except for the burlap bow. I may try to change that... oh, did I mention I can't make bows either? yeah, add that to the list.
It doesn't show up well against my stone wall. The twigs are too much like the color of the stones. I guess you'll have that. It's not for my home anyway, it's for sale in my Facebook shop, which you can find the link to at the top of the sidebar on the right. ya know, just in case you're interested in this beauty.
This project was a chosen one at these blogs:
Parties I'm linking to:
Sep 12, 2013
Fall Decor & More
I'm slowly but surely trying to get back into the blogging swing of things. It's an easy habit to let slide when you haven't done it months, but I'm working on it.
It's been in the high 90's for temperatures around here lately, but with it being mid-September and all, we have to start thinking about Fall. My yard is trying to prepare me by already requiring a raking of the leaves. Since we live in a clearing in the middle of the woods, this is an all season endeavor until the yard is then covered in a blanket of white (if we're lucky).
Since I have started selling my re-designed items out of my home now, I have to try to be prepared for all the seasons & more holidays than before when all I did was just 3 Christmas time craft shows.
This isn't my first fall project this year. I've started quite a few, and moving along at what feels like a snails pace, I'm getting them done, one by one.
If you want to see what is listed so far, you can click on my Rustique & Chic Facebook link located in my sidebar at the right. Once there, everything is sorted into Albums. If you like what you see & want to be kept updated on any new listings, be sure to click the "Like" button. 95% of my items are one of a kind and don't have multiples of.
If you look at the upper left-hand corner of the photo at the beginning of this post, you'll see a hint of a wreath I made that's listed on my selling page.
Sorry about the shameless plug for my "shop", now to get back to the subject.
Sorry about the poor photo quality... |
It still looked kind of plain & uninteresting to me, so I added the quote on the front with a matte finish brown vinyl. The grooves in the pumpkin made applying the vinyl a bit, shall we say....interesting?
The font I used was Exmouth, except for the "B", which is Edwardian Script. I wanted something that was more elegant looking, since I had Thanksgiving in mind when I started this project.
Add caption |
If you're lucky, more posts with Fall & Halloween themed projects will be following soon! Want to see these, and many more wonderful ideas for making your home Fall cozy and inviting? Then you need to head on over to Reveal: Fantastic Fall Decorating DIY Ideas for inspiration overload!
Linking up to the following parties:
Labels:
2013,
decor,
fall,
Silhouette,
thanksgiving,
vinyl
Sep 6, 2013
Another Chair Make Over
Hey there!
Remember me??
I know, it's been a really long time. As in MONTHS.
It's been quite a summer for us this year. We haven't done much swimming in our pool because of the rainy & mostly cool weather, so I'm not even sure why we opened it this year, other than the fact it needs a new cover for next winter. It wasn't until after Independence Day when we finally opened it up & my daughter has only swam in it twice.
We've had quite a major time hog with a project that we've been working on since early May, but I can't disclose that just yet.
The other time hog has been taking our daughter, Brooke, to rehearsals, literally since the day after the last day of school in May. She was in a local production of Joseph & the Amazing Technicolor Dreamcoat as part of the children's choir.
They are now done with their 6 performances and I have to say it's been a fun ride and an amazing experience for all of us, in spite of the time & fuel consumption! I'm so very proud of my daughter and the entire cast of crew of this show. They had put on an AH-mazing show all 6 nights.
This is the Pharaoh, the guy who played him was awesome & the audience loved him!
This was from what is called the Megamix at the end of the play. Check out "Joseph's" guitar glasses (far left). If you can pay close attention to the blonde haired boy in the green shirt, you may get to see him in an upcoming Disney movie that was being filmed in a nearby town. He was an extra in the movie & was even chosen to play a small part in the talent show portion. This little boy is really something & quite a little entertainer!
They got better & better with each performance. They received standing ovations every night, as well. Even though it's been quite time consuming for our summer, our entire family has loved every minute of this new "adventure" & wouldn't have missed it - with that being said, we're also glad that it's finished.
That's just a little bit about our summer...
I have been working tons of craft projects during this time as well. I hadn't gotten many photos taken of them before they were sold, which is a good thing in a way!
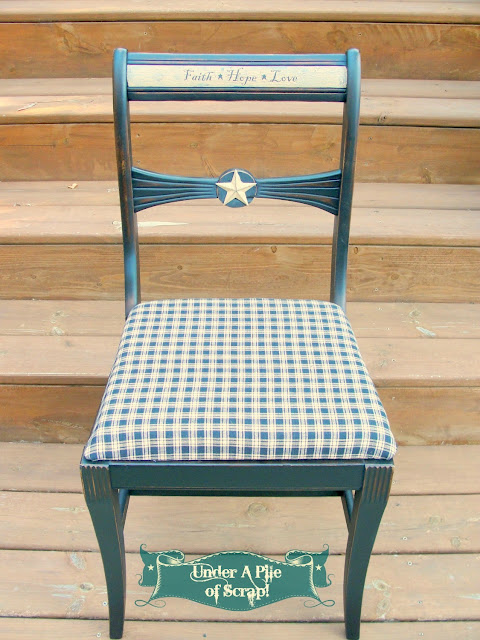
I did come across a vintage chair at a garage sale recently. I already have more chairs to redo than I know what to do with, but the price was crazy cheap & it only had a small flaw that I would end up creatively camouflaging.
I replaced the padding on the seat and recovered it. In the meantime, I painted the chair black & did some light distressing.
Since I like making things that force me to "think outside the proverbial box" I wanted to add a little extra something out of the ordinary to this chair.
I crackle painted the top brace & stenciled the quote "Faith Hope Love" with some small prim stars in between. Also, if you look closely at the lower right point of the star in the circle, there is a chunk missing. I added the metal star to draw your attention away from the flaw. I started with a larger star that completely covered the missing chunk, but the first time I sat on the chair to check for comfort, the belt loop on my jeans caught a point of that star & bent it all up. Start over - use smaller star.
I have been making so much stuff lately that is black & more prim looking. I have a customer that really likes that look, so I've been working several pieces for her. She didn't purchase this, so it's going in my "shop" (Rustique & Chic).
So, for those of you wondering where I've been & what I've been up to, that's basically it in a nutshell. Hopefully my next blog post won't be a whole season from now.
Parties I'm Linking to:
Subscribe to:
Posts (Atom)