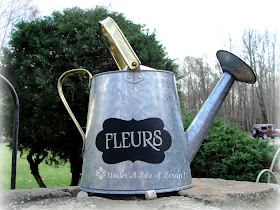
I bought this galvanized watering can from a garage sale,
I think. It might have even been free from one of my hubby's trash
"reclaiming" missions. I just don't recall for sure.

Cute enough. I like the shape of it, but not the flower decal or brass handles so much. The decal was on both sides of the can and the other side was chipping off and they resembled a thicker rub-on. I just used some old nail polish remover that was made with Acetone and it took it all off. I don't think nail polish remover is made with Acetone anymore, but I do know you can purchase acetone at Walmart in the paint dept. I don't know if nail polish remover that is made today without acetone would get it off, sometimes I can't even get it to take off nail polish without using half the bottle. :^( just sayin'....
After getting the decals off, I wanted to add a decorative chalkboard vinyl label, so I used my Cricut Expression and some chalkboard vinyl that I won in a drawing from Smart Buy Gal's Shop and Forum, which came from CraftVinyl.com. I discovered, after the fact, that this particular vinyl was significantly thicker than the standard vinyl I'm used to using. It didn't cut through at all with the usual 3-3-3 blade settings. I was able to get it to tear cleanly along the cut line though. Whew!
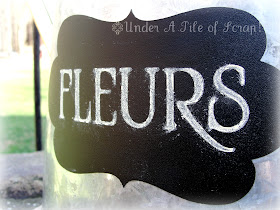
I used the Storybook cartridge for this shape. It's clearly obvious that I can't stencil words on straight, can I? Good thing it's only chalk.
Speaking of the stenciling, I used a vinyl stencil that I cut from the Botanicals Lite Cartridge for the word FLEURS. I'm not very good at keeping the chalk from smudging, but I think if I would have used chalk-markers, it would turn out better (note to self...need to get these markers)
I still need to see what I can do with the brass-like finish on the handles and the sprinkler head, but I like how the chalkboard vinyl turned out.
********************************************
This project was Featured over at I Gotta Create Blog!
I'm linking up to these parties:


I love it! And I didn't know there was such a thing as chalk markers!! Where does one buy those? I had a hard enough time just finding regular chalk.
ReplyDeleteOh, thank you!
DeleteI only recently learned about chalk markers and I found a set at Hobby Lobby. They are pricey (U.S.$12) so you'll definitely want to use a coupon (I didn't have one that day) I heard that Joanne's has them, but not at our small store. Haven't checked at Michaels yet, but I would think they would.
That is so cute. Love it, thanks for sharing with the newbie party.
ReplyDeleteThanks for stopping by!
DeleteLove this! Would love to have one for my boutique flower shop. Don't have a cricut, but guess I could use a stencil.
ReplyDeleteThank you for your very kind comment Mimi! It would look amazing in a window or little table filled with flowers! And one would think with all the daffodils & Hyacinths I have blooming right now, I could have staged this a little better. LOL!
DeleteI hope this inspires you to pull out some stencils and make your own! It's so easy!
Visiting from Debbie Doos! Your project is amazingly creative! I love all the inspiration.
ReplyDeleteThanks for sharing :)
blessings,
karianne
Thanks for stopping in and leaving such a sweet comment Karianne! It's much appreciated!
DeleteI think it turned out lovely.
ReplyDeleteI would use it to hold some flower in, so cute.
mmm love it - the chalkboard shape and getting rid of the old decal brought this a whole new life!
ReplyDeletewww.NorthernCottage.net
Thanks! I like that it can used all year round just by what is written on the vinyl and what's placed in the can!
DeleteFABULOUS! A perfect addition to a spring garden. I love the font you used.
ReplyDeleteThank you! And that font is one of my favorite Cricut cartridge fonts!
Deletelooks beautiful - I LOVE chalkboard paint.
ReplyDeletevisiting from Fireflies and Jellybeans
Thank you Heather! This could easily be recreated using chalkboard paint and a stencil.
DeleteI'm stopping by from Debbie-Doo's ...
ReplyDeleteThis project turned out great! Thanks so much for the chalkboard paint inspiration ...
:)
Linda
www.itallstartedwithpaint.com
Thank you Linda! This could easily be done with paint and a stencil and it becomes versatile all year round just by changing out whatever you stick in the can and what you write on it.
DeleteWish I had a machine that could do this! Love the idea and I have a whole collection of old watering cans.
ReplyDeleteIt's adorable!!! Perfect spring project. Thanks so much for linking up!
ReplyDeleteIgottacreate.blogspot.com
Spring Fling linky party
You're a STAR tonight at I Gotta Create!
ReplyDeletehttp://igottacreate.blogspot.com/2012/03/spring-fling-features-week-2-new-link.html
Spring Fling linky party