So here goes, I hope I can make it clear enough, since I don't have video capabilities, so this will be with photos instead & I can't seem to be smart enough to get Blogger to work the way I want it to. I say that all the time, but it's true.
Here are the top & bottom pieces cut at 11" (or Fit To Page function) using the Storybook cartridge. I've used some older Scenice Route double-sided papers here.

This is the reverse side of the Lid. I have placed the corner scallops at the 2" mark & used the cutting channel of my paper trimmer to score/emboss a fold line & I repeated this for all 4 sides.


For the bottom portion of the box, I've done the same thing, only I scored all 4 of my fold lines at 2 1/8", using a ruler as a guide can help to keep the paper lined up better at the top & bottom marks.
You need the bottom portion of the box to be slightly smaller than the top for it to fit properly without causing it to flex.

This doesn't show up very well here, but this shows where the score lines cross at the corners.

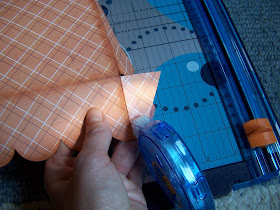
Then, you need to take your scissors & follow the score line just to where it meets the cross score line.

I can't explain clear enough how to cut the corners in the proper fashion, so you just need to see the photo below to maybe get a better idea of how to the cut the corners.
Then you fold them up so that the opposite sides are facing each other.

I like to trim the corners a bit in this style because otherwise, I get a bit of uneven overlapping that just doesn't look appealing to me.
Then, I fold the paper upwards/inwards along the score lines to create the box shape.

After that, I place adhesive just on the outside of the flaps.

From there, I carefully line up the corners & stick the flap to the straight cut piece & repeat for all the corners.


Here is the sticker sheet I used from Creative Imaginations for the quote. You could make lots of boxes with this one sheet!

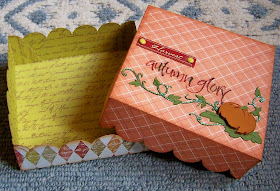
Here is the completed box. The pumpkin/vine was created using the Happily Ever After Cricut cartridge, cut at 3 1/2" & layered with pop dots on the pumpkin. I then added Crystal Stickles to the vine. It's a clear stickles, but the glitter has a bit of a green sheen to it that brings out the color of the vine. The Harvest label is one I bought from Walmart either last year or the year before.

Here is my daughter, Brooke, modeling the side view with a peak at the bottom, as well.

This is a view of the inside too.

I hope this was clear enough for you to be able to make your own box. Play around with the design to make them smaller & add lots of fun stuff using your Cricut. I made this basic one to use up some older stuff I had on hand, but the possibilities are endless!

Very nice. The instructions were great.
ReplyDeleteGreat box Beth!! Need to make some of my own!
ReplyDelete