Pages

Jan 15, 2013

Need an Effective Squirrel Deterrent?

**UPDATE - We had to put a galvanized tube over the green pipe because after a couple of weeks, one squirrel was able to jump high enough to be able to climb to the top. Now they can't even hang on at all. (wink)
Squirrels at the bird feeder
Are you like me? I know I'm not the only one. Do you have a major problem with keeping the squirrels out of your bird feeders? You feel like you've tried everything? All the expensive feeder gimmicks? Luckily, I haven't gone that route, but don't think I haven't been tempted. I'm just too cheap!

If we lived somewhere that didn't have over 13 acres of acorn producing woodland, this might not bother me. But we do! There are piles of acorns everywhere for them to eat! 

I've tried one method that was effective in the summer, but not so much in the winter. That was slathering up the feeder pole with gobs of Vaseline. It HAD to be Vaseline too. I tried the dollar store variety and they were a different consistency that was noticeably different in texture. It proved to be no match for the squirrels. Vaseline was good for the warmer months, but must get a little harder in the winter time which still allows the squirrels to get a grip on the pole and shimmy up it to a feast of the sunflower seeds that await at the top. Grrrr!

So as we were having breakfast Sunday morning, we noticed that the squirrels were able to jump halfway up the metal pole and make their way up the other couple of feet to the feeder. I just mentioned nonchalantly to my husband that I wonder if the pole was just skinny enough for the squirrels to get their paws around and that's why they had no problem getting up there. 

What if......what if there was a big pipe that we could slip over the pole that was too big for the squirrels paws to wrap around and NOT get a grip on? Hmmm....my hubby was pondering this thought. 

Lucky for me, the hubby is a plumber and there is always pieces of pipe (among other "supplies") sitting around just in case. It just so happens that there was a long enough piece of 4" pipe laying behind the garage. I never had a doubt there was. He did some measuring and went to work.


bird feeder

Of course the pipe HAD to be this vivid shade of green and all nasty from sitting on the ground for who knows how long. A total eyesore indeed. It will surely be a true test, because I'm sure the squirrels wondered what in the world that tall green giant thing was that goes up to their stash of food. 

Shoot! It didn't scare them! 

at. first. 

Oh yeah, they thought they were just going to go scurrying up that green giant like it was just another tree. And they had a pretty good start! I thought to myself, "Oh no, failure again." But as I'm watching them, one by one, try to outdo the other in their mighty attempts to climb that green giant, they could get so far up and then they'd stop! Oh, they'd try to hold on. They'd look to the ground as they begin to slowly slide back down and then they'd have to jump back down to the ground. Each one failed. Miserably. YES!

This is about as far on the post as they can jump up to. He's hanging on for all it's worth. 

So the pipe has to be long enough that they can't jump high enough to reach the top. This one is probably about 6 ft. tall. It's taller than me and I'm 5'2".

Here's the same one, after numerous tries of jumping onto the pipe, he has to jump down each time. He never makes it all the way up. 


Now the squirrels all just hang out like bottom feeders, eating only what falls from the diner that hangs above them. Out of their reach. 

The pipe is probably not cheap, but it can save you a bundle over time in the amount of bird seed you buy that goes in the squirrel's bellies & not the birds.  

I don't know if galvanized pipe would be any better since it would get a rough texture over time, giving them something to help them cling onto, unless you want to slick it up with Vaseline also. Just a thought.

I hope this works for the long haul and I hope it works for you if you try it.

Photobucket
 Linking to these parties:

Jan 14, 2013

A Burlap Fabric Memo Board to Check Out!

In my quest to prepare for some craft shows in late 2012, I was in a flurry to get lots of projects done to fill the large space(s) I had rented. However, in that mad flurry of painting, gluing, sewing, covering & buying, I didn't really allow myself to make the time to take pictures of quite a few of those items. Only the best of the best made that cut for a photo op. Mainly furniture. And those items sure didn't get a blog post done about them either. Again. Mainly furniture was my focus. 

Now that things have slowed to a more normal pace and the crazy holidays are behind us, I still have a few of those pieces left to help fill in the gaps of my blog posting. Especially since I haven't really done anything creative since the new year has rang in. Just the unsatisfying attempts at purging and organizing my home. We're not EEEEVEN going to go there right now, but I should be instead of writing this.

So for today's blog filler, I bring to you this half vintage + half vintagey-looking item.
vintage, antique, burlap, diy, upcycle, repurposed, farmhouse, decor, mantel,

I found the frame at a flea market, and if you think it looks grungy right now, you should have seen it before I cleaned it with a soft toothbrush & cleaner! You really couldn't tell it was white at all. I wanted to put an old grain sack in the opening, but at the time, I hadn't found any that large (of course, I have now). Since I had this burlap fabric sitting around just filling in my hoarding space, I used some of it for this. I nearly had a buyer for it, but she didn't have a space large enough in her kitchen to hang it where she needed it most. I have that same problem, so I could relate. 


This is just a little closer look.


Pictured here is detail of the plaster bow at the top of the frame. It's kind of worn, chipped and cracked, for that perfect aged look. It's a little bit feminine and a little bit masculine, a little light, and a little dark and all neutral.

Because it was so nice and warm here on Saturday (yes, it is the middle of January) I was going to start on stripping a table I need to work on for a customer. But for the life of me, I can't seem to locate that brand new bottle of stripper I have. You can't miss it either, it's orange! AHHHHH! I have apparently moved it from it's long time location to somewhere new for the sake of organizing for the holidays. I don't really think you can call it organizing if you can't find it! 

It happens all the time.


Photobucket 
Linking to these parties:
Jan 13, 2013

Some How I Learned to Paint Furniture


What things have you done, but previously thought you could never do?
 

Well, we're now into Week 3 of the Folk Magazine's Blog Journal Agenda, and as I sit here and ponder this question, the one thing that sticks out the most in my mind is for me being able to create beautiful furniture. The kind that I'm used to seeing on OTHERS blogs. The kind that I've drooled over having, forget about trying to create myself. 

I thought I would be crazy to even attempt just the painting part alone. But to do distressing that looked even remotely authentic? Pssshhh... that would be a stretch! And artistic designs? Whaaaaaat? Surely if I made it that far, then I'd be screwing it up at this point in the game. Then it would be called treasure to trash instead of trash to treasure. Cuz that's just how I roll sometimes.

However, on a whim I decided that I was going to jump in with both feet and try doing all 3 challenging techniques on my first try. Boy, was I setting myself up for failure, or what? The correct answer here should be yes. I will have to say that I have what they call Beginner's Luck. And with that being said, my first project was an easy breezy success!

First Painted Project
This was my first piece of furniture refinishing.  Yes! I did it!  I couldn't have been more pleased with myself. 

I made and used my own chalkpaint for the first time and loved it! I stained it and distress sanded it and I thought it turned out beautiful.  
First Image Transfer
I also discovered the technique of transferring images, and even though I was terrified of attempting this, I did it and it worked out perfect! I felt lucky indeed. It didn't raise any eyebrows in the blogging world, but I felt really good about it. It sold at my craft show in the first hour and so many others were disappointed that it was sold.

However, there is a downside to this whole Beginner's Luck thing. Eventually you start to fail at the very thing you did so perfectly the first time, and it gets worse with each attemptOne would think that if you got it from the beginning, then you have it forever. 

Not so. Not in my case. I don't why that is - perhaps it's all the variables, like the time of day, number of cups of coffee before 10 a.m. Lack of sleep, too much sleep. Room too hot, too cold, just right. A phone call from your hubby or a friend, or no phone call at all, from anyone. You get my drift. I'll use anything for an excuse as to why a project didn't turn out, it just wasn't MY fault. E'hem.

I felt confident enough to try my hand at another painting project. Would I? Could I be lucky enough a 2nd time? I don't have a good track record for that sort of thing. It might be the ADD in me. I've never been tested, but I think I'm a good candidate. I wanted to prove that the odds that were usually against me had finally met their match.

My Best Work?
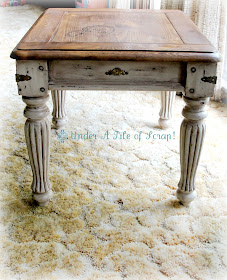
Meet Table #2. This might be THE best table I ever made, or at least a very, very close 2nd. The post about this table has had the most hits and comments for me on my blog and Pinned more than any of my other stuff - combined.

You have to admit the table design itself has great bones and unless you just flat out smashed it with a sledge hammer, it would be pretty no matter what. I will say that I'm kicking myself for not keeping it. I did need an end table too. I added the antique metal pieces that I had for years and boy did they really kick the looks of this up a notch!

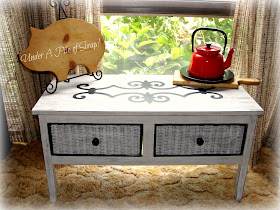
Not to let my skills get lazy, I decided I wanted to get a little more artistic and put my Cricut to work for me by trying something like this.
diy,  painted furniture, distressed, decor, home decor,
First Stenciled Table
 I know, it's a crappy picture and photography is one thing I still CAN'T do well.

First Stenciled Table
This is the top details. 
 
This table was a labor of love, I guess. Two-toned painting and it seemed like I was painting it over and over and over. I was glad when it was done.

Then I tried this with my Cricut too. Ummmm, never again will I do that big of a design again. At least not for a while. Thank goodness it worked out the first time! There's that beginner's luck thing again, it wasn't skill, that's for sure.
farmhouse, painted furniture, rustic, home decor, shabby decor, kitchen
Pretty Little Thing

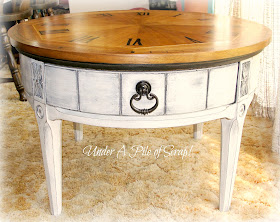
And last, but not really the least at all, The Clock Face Table
farmhouse, home decor, rustic, country, shabby, painted furniture,
The Clock Face Table
This could be the one that puts Table #2 in 2nd place. However, it hasn't drawn the traffic, comments or pins the other did, but I think she's a stunning piece. She was a bit of a challenge to do too. I sanded the numbers off twice I think, before finally getting them just right

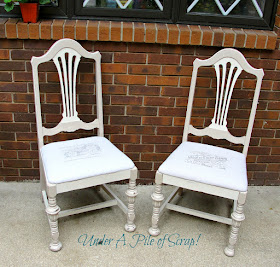
I also painted and recovered a pair of vintage chairs. I've never recovered any furniture before. I don't care if it was just the seats, that was big deal for me too.
drop cloth, painted furniture, chairs, shabby, grain sack, grainsack, diy
Re-Invintaged Chairs
  
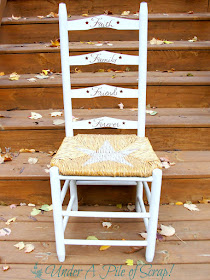
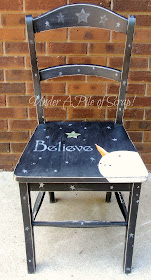
And I did this chair in what I call a reverse stencil design with the words & little stars so the wood could show through. It was inspired by a chair I seen on Pinterest - in a very round about way.
painted furniture, ladder back chair, chalk paint
Sort of Pinterest Inspired
And I cannot, will not forget this guy!
repurpose, Christmas decor, Winter decor, Porch decor, farmhouse, diy, painted furniture
Snowman Chair
I have painted and sold 3 chairs like this! Not that it's difficult to draw a circle and a triangle, but I was proud that I could do both by hand and they actually turned out looking like a snowman with a carrot nose.

The fact that I painted this much furniture in one year is a HUGE accomplishment for me! And that doesn't even include all the other things I made that wasn't furniture related.

I never thought I could have the dedication to work this hard at something, even with all the set backs that came along with it. 

I guess that's when you know you found what you love. 

I never thought I would do that either.

With all that, it has made me believe that I have what it takes to open MY own business doing this, what I love, and it could flourish in my community.  I never in my wildest dreams thought I would ever own my own business. Yet, here I am, discussing with my husband, family and friends. Actually thinking & talking it through.

It hasn't happened yet, and it may not actually come to reality, but right now I believe that I have that ability to do it.


 Photobucket

Jan 5, 2013

Mosaic Gazing Ball - or is it?

repurpose, garden decor, outdoor decor, garden,

Some of you may know that, on occasion, I like to repurpose things into other things. From the seemingly most mundane (ugly) items into things you might not ever think of them becoming. It's like the story of the ugly duckling that grows into the beautiful swan. I guess I just like the shock factor I get from people when they learn what it originally was. 

I started making gazing balls when I started following a gardening chat room back in 2009. It was the junk section where people would take junk finds and turn them into unique decor.

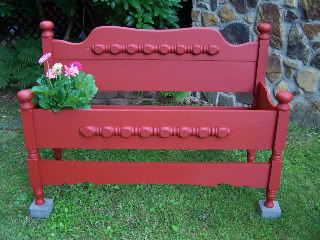
repurposed, painted furniture, garden art, garden decor, outdoor decor, flowers, red bench, potting bench, farmhouse
That's where I learned about bed benches & when I had my husband make this one

So these people started showing off these gazing balls they made and they looked so pretty! Since they were made with those dastardly flat glass marbles, that I had so many of, from who knows what fly by night project I thought I needed them for (beta fish & plant in a vase maybe?) it was Perfect! But what was I going to use for the ball? As I read over & over, they were all using old bowling balls! 

Get outta Dodge! Really? 

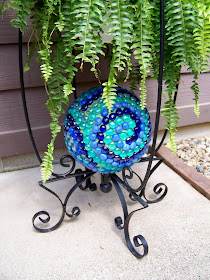
Weeeeellll, now I was on the hunt for a bowling ball and I found one. I made one of those gazing balls. And this was it.
 repurposed bowling ball, garden art, garden, garden decor, outdoor decor, upcycle,
I loved how it turned out. I painted it a bright apple green spray paint before applying the marbles. The background color really sets off the clear and turquoise marbles against the opaque and dark blues. You can spot it in the garden a mile away, well maybe a little less than a mile.

My step-sister loved it so much that I made her one too. Sadly, she passed away this last fall. I think it would be nice if she could have it at her grave, but I don't know if that could or would happen.

I'm supposed to make one for my husband's boss' wife, but I slacked on getting that one done this last summer, so I need to make sure it happens before the spring thaw this year. 

One of my very good friends stopped by a few months back and seen this and she was going to pay me to make her one. She was going to buy the marbles herself, but I guess with the thought of deciding on colors and finding enough, she decided she was over that. So I thought I would go ahead and make it for her - for her birthday. 

I finally gave it to her today. She seemed genuinely thrilled with how it turned out. Whew! I never know if things I make with my own designs are going to be well received.
bowling ball, gazing ball, garden art, garden decor, outdoor decor, repurpose, upcycle,
I started doing it in the same swirl design like I did on my own, since she seemed to really like that pattern.


Then I kind of started straying away from that design because I wanted you to be able to see a different design depending on which side of the ball you were facing. This one kind of has some swirly stems with flowers dangling from them.

garden art, garden decor, outdoor decor, repurpose, upcycle
Then I was left with all these green and pink marbles and no more brown ones, so I started just doing pink flowers in a sea of green. I'm thinking of maybe just doing an entire ball like that. What do you think?

I have several bowling balls ready for their swan show and spring IS just around the corner. I guess I better "get on the ball!" sorry, I couldn't resist.

*************************************************************

Photobucket 
I'm linking to these parties: